
Quilling Earrings | Quilling Course
Make a statement with our handmade quilling earrings and show off your unique style! Create different quilled earrings with MySkillShaala community!
 10-20 mins
Are you ready to unleash your creativity and make a statement with unique and beautiful quilling earrings? Using different shapes and paper strips, you can craft one-of-a-kind earrings that are sure to turn heads. And the best part? You can easily share your creations with the MySkillShaala community, inspiring others to try their hand at this fun and rewarding crafts and also earn coins and XP''s! So why wait? Grab your quilling tools and let your imagination soar as you create stunning earrings that are as unique as you are.
Materials Needed -
- Quilling strips
- Needle
- Glue
- Tweezers
- Hooks
- Jump Rings
YOU CAN EARN...!
+10XPs

Ready to create stunning quilling earrings that will turn heads and show off your unique style?
Don't worry if you missed the video tutorial – we've got you covered with simple step-by-step instructions that will have you crafting beautiful earrings in no time!
Gather all the materials and let's begin making the quilling earrings:
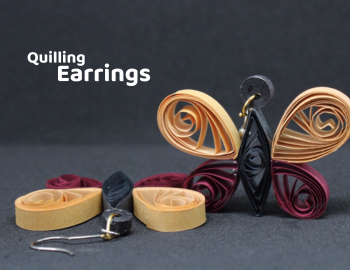
Step 1: We are going to make butterfly shaped quilling earrings today. Remember that to make the best flaunting earrings, the quilling strip that you use should be thin, flexible and easy to roll.
Step 2: Take two strips and make a coil out of it. Press it fand turn it into a teardrop.
(In case, you want to learn to make a perfect teardrop, here is the tutorial for it). Make total 4 teardrops.
Step 3: Now, in this step we shall take half of the strip and make a bit smaller teardrop.
Step 4: If you are done with the teardrops, let's move further to the middle body. Take a strip, make a loose coil and pinch it rom both the sides as much as possible. Done? Great, now you are done with the main body, two upper wings and two lower wings. Place them at their proper position and stick them. Keep them aside for drying.
Step 5: Moving further to the head, use a small ring coil and insert it into the jump ring. Attach a hook to it which is to be inserted in our ear hole.
Step 6: Stick the head to the main body and you are ready with your DIY EARRINGS!
For modifications, you can use variety of colored quilling strips. You can even create different shapes apart from Butterfly!

Did you know that Quilling can be relaxing and meditative! People feel calm and relaxed while they quill and it reduces stress and anxiety!
Quilling was often used to create religious objects, such as images of saints and angels, as well as decorative items for the home.
By the way did you make your earrings? Then flaunt with them!
You can even create Quilling Rings! Let's not wait and begin making rings...